March 2017 banner

March 2017 banner

Saturday 12 December 2015

First flight after re-build - one happy pilot!


Big day today, first 2 flights after re-build. A week ago I did my ground tests. All satisfactory, all appeard normal. But I had decided to take it easy and think it through before the first flight.
I have spent a week thinking and now it was time...
Already last week my Simonini Victor 2 started on first try. No issues starting this time, the new spark plugs appears to have fixed the issue with oil filled plugs. The impression of thrust on the ground with the new propeller is impressive, I clearly get more out of the enginnge now than with my old 3 blade with too hich pitch. At least in terms of take off performance and that was the primary objective.
Shorter takeoff than what I'm used to and really impressive climb. All appears normal. Test start at level flight. I use my new "poor man's Sonex trim" to trim the plane. 
Look, no hands..!
Believe it or not, just under 5000 RPM, I could fly hands free and by weight shifting, i.e. by leaning to one side or the other, make the plane turn... No adjustements needed...
This is too good to be true. Checked the flapperons for flutter at minimum deflection and no reveres tendencies at full deflection. Nothing. Even the pilot appeared to be up to the task after 2 years of no flying but it should be said that the air was perfectly calm and stable. 
The lift reserve indicator was, naturally, way off during the first flight. I made a slight adjustment for the second flight and got pretty close to a good indication of stall. Some fine tuning still needed.
I feel just like after my first solo flight. Proud and happy.

Wednesday 18 November 2015

Up next, ground and flight tests...

Finally... I think I'm ready to start the ground test. I still need to verify CG before placing the battery but have good hope of being able to change to a light weight battery. 
And then.... test flights...


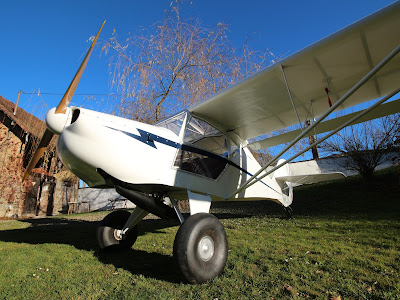
Those tires (and a fish-eye lens) really give the plane an attitude...

Sunday 15 November 2015

A subsonic spinner for the new propeller

To keep the snub-nosed profile of the Avid Flyer, underlined by the tundra tires, the double Simonini exhaust pipes and the Cub inspired decoration, I wanted a shorter spinner than for the old Warprive propeller. As usual, when looking for aircraft parts, I found what I didn’t want at the usual ridiculously high prices… What I wanted was something like a spherical kitchen mixing bowl. In France we call them “cul-de-poule”…
So, as I knew what I wanted I went for a DIY spinner and ordered a cul-de-poule with the right diameter from an online cooking utensils shop and made a spinner support in fiberglass and resin. The trickiest part was to get the right cutout for the propeller as the spinner is short and therefore very curved.
Someone might argue that this is not the optimum aerodynamic shape for a spinner. While this is true the difference should be minor as long as I stay subsonic... 

Monday 2 November 2015

"La mise en croix"


Thank you Alain, Daniel, Thierry and Octave for precious helping hands while putting the wings back on the plane...

Thursday 29 October 2015

BIG IS BEAUTIFUL

I just changed to 850-6 Aero Classic "Tundra" low pressure tires from Desser that got rave reports from Avid Flyer users who tried them.
Calling a 850 tire for "tundra" will make the true bush pilots smile, but I can live with that....

Wednesday 28 October 2015

Returning to the initial topic of this blog…

I’m now returning to the initial topic of this blog; the use of the Simonini Victor 2 engine.
The plan is to get the wings on the plane this weekend and as soon as my new propeller arrives I'll be back in the air again (yes Mother, of course 
I will do all the required tests and verifications first...)
But before leaving the ORATEX history let me share my thoughts so far…

What I really liked
  • The ease of use It turn out to be very pleasant to work with. It easily adapt to the required shapes like rounded wing tips. It is “clean” to work with and smaller parts can be covered in your office or living room…
  • Mastering the weight Weight is always a to be considered and knowing for sure, in advance, how much you will add when covering the plane is very nice. And it is light… covering the wings of my Avid Flyer added just under 3 kg.
  • No solvents Sure, covering a plane it is a “once in a lifetime” event and breathing the traditional solvents when doing it once won’t kill you (but it might make you dizzy…). With the hot-melt as only liquid component, and this being non inflammable and free of smell, the exposure is reduced to next to nothing (you might still have to degrease some parts before applying the hot-melt). There are no concerns heating your workshop and working with the doors closed. Some might wave this “no solvent” argument but for me it is a really strong point in the system.
  • No paint job This goes with the 2 previous points. Some like the paint part of the work, I don’t. Once you have put the final tension of the fabric you are done, finished. It saves a lot of time. With traditional methods you would just be ready to apply your first coating, or maybe not even that, maybe you would just start the sanding of the surfaces to paint…And there is no paint that will crack and peel off later…
  • The quality of the product I have been using the UL600 for most parts and it is very strong and resistant (there are good demos on the web and see also my stress tests on this blog posted September 2011 ). For a few parts (landing gear) have used the 6000 version (600 is for planes up to 600 kg while 6000 is for up to 6 tons…) and it appears extremely rugged.
    Popular passenger footwear
    There is no way your passenger will harm it when climbing in or out unless wearing ice skates (and even then…). The hot-melt creates, through polymerization, an incredibly strong bond to both frame and fabric on fabric. The impression is that it is much stronger than Dacron to frame or Dacron to Dacron.  Yes, the second part of “quality” is obviously how it resist in time, but I don’t have that knowledge yet to share.
  • Very good and friendly service from the manufacturer They don’t hesitate to send you a mail to verify you have ordered the right stuff and come with advice. The product is expensive by the meter (but total cost is fully comparable with traditional methods) so you don’t want to buy more then you need. I found they had been very generous when cutting the ordered length and I have leftovers for future repair and could even redo the elevator that I did first and is not 100% satisfied with.

To be considered (but without therefore being real concerns):
  • Surface aspect For most parts of what is covered the final aspect is perfect. Not as shiny as you get from (new) paint but it looks really great. But there are no filler or multiple paint layers of paint that will hide where you have an overlap. If you look close you will always see the different pieces of fabric. And difficult to cover “straight corners” of rudders etc. might not be esthetically perfect.  You should be aware of this if you are looking for the all over glossy and perfect “just out of the factory” look.
  • The hot-melt turns yellow The hot-melt, white when liquid, transparent when dry, will turn light yellow once the polymerization is completed. As mentioned it is incredibly strong and therefore impossible to remove once set. Make sure you don’t get glue where you don’t want it. I have been forced to cover some clue stains with paint…
  • The white UL600 is not opaque I have been using white UL600 and it is very white but not completely opaque. Covered dark elements sometimes give the impression of less “white” areas. This is not a major concern but be known when preparing the structure (or making the choice of color).
  • “Smelly paint” While the hot-melt for the fabric is without harmful solvents the matching 2 component paint is something you should avoid breathing. It feels unfair to complain about smelly paint when the traditional alternative is smelly "everything', maybe it is the contrast to the fabric and glue process that makes me sensitive. However, the color matches perfectly the color and aspect of the fabric and the result is a highly resistant and elastic paint that is really up to the job.
Conclusion
For me, with my taste, my preferences and my intended use, the positive side of ORATEX clearly wins over the above mentioned “inconveniences”. Without hesitation I would use it again if I was to start over again and I will definitely use it for my next project (that at the moment is just an idea in the back of my head…)
The next step in sharing the ORATEX experience will be to see how it stand up to maintenance and time... I will post comments on this in the future.

Tuesday 6 October 2015

New prop


A new 2 blade wood prop, made to order by Aerobat in Spain, should arrive in 3 weeks...

Wednesday 30 September 2015

DIY Lift Reserve Indicator

I have completely forgot to tell you about my Lift Reserve Indicator project. 
For reasons that we don’t need to repeat I have gained a particular interest in the stall point at landing... 
A traditional angle of attack meter is complex and expensive (and feels like overkill for an ultralight aircraft) but I found a number of articles on the web talking about  “Lift Reserve Indicator” (here is one, here is another, and you will find many others as well as "for and against discussions" doing a simple search…). 
While producing very much the same information as a traditional AOA indicator it is just a differential pressure gauge connected to a probe with forward and aft ports - and therefore at a fraction of the price and easy to do yourself... 
I got a 0-2.0" WC Dwyer pressure gauge from Amazon (but there is obvious other sources) and made a new gauge face using a inkjet printer... Inspired by the Icon Aircraft Lift Reserve Indicator I added a wing profile to the needle. It will make it more readable by the corner of the eye... 
The probe is an aluminum bar, (1 cm by 2 cm) as long I could drill (some 13 centimeters). It is mounted approximately at ~20% of the wing chord counted from the leading edge and leaning forward. The angle need to be refined in test flights to confirm the correct reading.  

If it works? I don’t know... but be sure I will tell you about it here once I have tested it in flight…

Monday 14 September 2015

A productive weekend

A major step in the reconstruction has been completed, both wings are now covered and finished (when using ORATEX that is actually a tautology…).
To document his major step I made what is probably my most boring film. And to make a boring film worse I forgot to lock the auto focus so with a big white object in the center of the frame the image is sometimes flickering… very annoying.
So, unless you are seriously considering using ORATEX for your air craft project you will have much more fun watching any of my other films.

Tuesday 1 September 2015

Covering the wings

I have started covering the wings and have just completed the left wing. 
The Avid Flyer wings are complicate to cover.The flaperon hinges are sticking out through the fabric as extended spars, the trailing edge is a wire and the only surface for gluing is the leading edge tube.
With the widest Oratex UL600 being 1800 mm it can not wrap the entire wing. I opted for pre assembling 2 sheets of fabric, one 1800 mm and one 900 mm, with a 15 cm overlap to make a wide enough sheet before attaching it to the wing structure.
The overlap by the trailing edge is glued (and the glue activated!) before covering the wing.
I cut holes for the flaperon attachments and had to start by covering the first 2/3 of both sides of the wing at the same time. The bottom sheet was glued to the leading edge tube, wrapping around it, and the top sheet then goes on top of it and an additional 10 cm behind the leading edge glued to the bottom sheet. The fabric is obviously also glued to the 1 inch wide cap strip of each spars (and the entire surface of the wing tanks).

A 2 piece reinforcement were added where the flaperon attachments goes through the fabric.


To make covering the first wing more challenging I also have the pitot tube, LRI probe and a trap door for a USB cable on the left wing. The red and black cable is in view of a future - eventual - wing tip strobe.  
With overlapping sheets that therefore need additional glue you have to add time for the glue drying but it is not difficult to finish a wing on a weekend. And when I say finish I mean it. No layers of paint to be applied.


I used 1400 grams of fabric (including the glue on the fabric) for the left wing. This means that even including the glue on the structure covering both wings will only add around 3 kg.
The right wing is ready to be covered but I'm out of glue at the moment so I'm doing the wing strut fairings at the moment...

Thursday 18 June 2015

My "best" modification...

A modification that I made already some years ago, and have been very happy with, was making it possible to open the upper part of the pilot door as a window (like on a Piper Cub or Citroen 2CV…). 
I have now simplified my earlier modification and applied it to both doors. While you can open the doors in flight, opening just a window reduce the risk of stuff falling/flying out and creates less drag. Great for hot summer days, both before takeoff and for flying cool with your elbow out the window...

The window frame is made of 12 mm aluminium tube ("seamlessly" joined by inserting a 10 mm tube...). The aluminium tube bend easily with a cheap 12 mm copper tube bender.  

The window will stay open by itself as long as you fly “clean” but it will close just when you are about to take that perfect photo while flying the plane with your knees. So I installed gas springs to keep them open. The perfect re-use of the door springs when they can no longer hold the entire door.
To keep the windows closed I use Citroen 2CV window latches – this is not the only similarity between this plane and those amazing french cars… 

Thursday 4 June 2015

DIY Wheel caps...

Not really the priority at the moment but fast and fun to do... As the wheel nut is extruding I could not do flat wheel caps and I was scratching my head how to do the required shape... The easy solution was heat-forming a sheet of polycarbonate... 
All it takes is a scrap piece of polycarbonte (from when doing the windscreen or windows), a heat gun, a right sized hole and a slightly bigger round object. Peel off the protective film from the "wheel side" and heat only that side. The rest you can guess...
I painted only the wheel side and this gave a nice glossy finish.

I'll be back soon with a more complete update...

Monday 23 March 2015

Long time, no post...

A lot of things have been going on and I have had limited time to work on the plane and even less time to update the blog. But here it comes...


The fuselage is completely covered and Victor is back home again and happy about his shining engine mount...


All instruments are in place (well, there is one missing but I'll come back to that in a later post) and the electrical system, centralized in a lunchbox, is 95% complete.
Next to the antenna mount is a "poor man's strobe". It is a simple led strobe and no, there is no interference with the radio. Not as good a real one, but much better than nothing at a very low cost.


The bungee cord attachments have been modified, I didn't like the crossing cords (the "in -triangle" reinforcements are not in place yet - Avid Flyer pilots know what I'm talking about). Throttle handle is back where my left hand rests and I have replaced the level trim/balance bungee cord by my home made version of the Sonex trim system.


The fuel system has been review with a protected, while easy to reach, tank selector and replication of the fuel level alert led. The button in the hole is air purge valve for the feeder tank. When one wing tank is empty the level on the feeder tank goes down and triggers the alert on the dashboard. After switching to the other wing tank the fuel level in the feeder tank is increased by purging the air.


A fuel tap has been placed close to the firewall and an easy to inspect (and replace) filer. The tap is accessed from under the dashboard and a micro switch triggers the fuel alert when not completely open.


The exhaust system is as usual difficult to position due to the classic Avid Flyer landing gear. At full bungee extension the gear can touch the pipes so I have made an extendable mount, linked to the landing gear, that will protect both in case of a hard landing...

Blog Archive